Last Updated on March 17, 2023 by Robinellis
To remove the brain from a deer skull, first make an incision in the neck and then insert a small hook or other sharp object into the brain. Slowly twist the hook to loosen the brain from the inside of the skull. Once it is loosened, carefully pull it out through the incision.
- Place the deer skull on a hard surface
- Insert the point of a sharp knife into the soft tissue at the base of the skull
- Apply pressure to the handle of the knife and cut through the tissue
- Continue cutting until you have made a hole large enough to fit your hand through
- Reach in and grab hold of the brain
- Gently pull it out of the skull
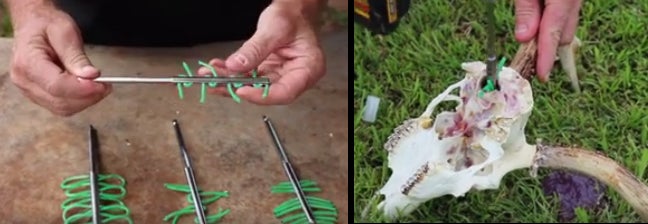
Deer Brain Removal Tool
When it comes to deer hunting, one of the most important things you need to do is remove the brain from the deer. This can seem like a daunting task, but with the right tools, it can be easily done.
One of the best tools for removing a deer brain is called a brain removal tool.
This tool is specifically designed for this purpose and makes the process much easier. It consists of two parts – a handle and a razor-sharp blade. The handle is used to grip the skull while the blade is inserted into the skull and used to cut through the bone and tissue.
To use this tool, simply insert the blade into the skull at an angle and then twist it around until you feel it hit resistance. Once you reach resistance, push down on the handle and twist it clockwise until you hear a popping sound. This indicates that you have successfully severed the spinal cord and removed the brain from its cavity.
If done correctly, using a brain removal tool is quick, easy, and relatively mess-free. However, if you are not experienced in using this type of tool, it is always best to seek help from someone who does before attempting to remove a deer brain yourself.
How to Remove Deer Brain for European Mount
If you’re a hunter, or just someone who appreciates the beauty of nature, you may want to learn how to remove a deer brain for European mount. This process is actually quite simple, and only requires a few tools that you likely already have in your home. Here’s what you’ll need:
-A knife
-A spoon
-A small drill bit (optional)
-Rubber gloves (optional)
First, begin by making a cut behind the deer’s ear, and then continue cutting down along the spine. You’ll want to make your cuts as close to the bone as possible.
Once you’ve made it all the way down the spine, flip the deer over so that its belly is facing up. At this point, you can use either your knife or a spoon to remove the brain. If using a spoon, simply insert it into the opening at the base of the skull and scoop outwards.
If using a knife, carefully insert it into the same opening and slice downwards until you’ve removed the entire brain.
Once removed, discard of the brain properly (do not leave it in nature!) and rinse off any remaining blood or tissue from your deer skull. You can now proceed with prepping your skull for mounting!
Fastest Way to Clean Deer Skull
If you’re looking for the fastest way to clean a deer skull, look no further! This method is quick, easy, and will leave your skull looking like new in no time.
What You’ll Need:
-A large bucket or tub
-Bleach (unclorinated is best)
-Water
-Wire brush
-Old toothbrush
-Gloves (optional)
Instructions:
1. Fill your bucket or tub with water and bleach. The ratio of water to bleach should be about 1 part bleach to 10 parts water.
Mix well.
2. Submerge the deer skull in the mixture and let soak for at least 24 hours. If possible, agitate the mixture occasionally to help loosen any remaining flesh or tissue.
3. After 24 hours, remove the skull from the mixture and rinse thoroughly with clean water.
4. Use a wire brush to remove any residual flesh or tissue from the surface of the skull. Be sure to get into all of the nooks and crannies!
How to Clean a Deer Skull Naturally
Deer hunting season is over and now it’s time to clean your trophy. This process can seem daunting, but if you take your time and follow these simple steps, you’ll end up with a beautiful deer skull that will last for years.
The first step is to remove all the meat from the skull.
This can be done with a sharp knife or a pair of pliers. Be sure to remove any brains or sinews as well. Once the skull is completely clean, rinse it off with water to remove any blood or debris.
Next, you’ll need to whiten the skull. There are many commercial products available for this purpose, but you can also use household bleach. Simply mix equal parts bleach and water in a large container and submerge the skull completely.
Let it soak for 24 hours, then remove it and rinse thoroughly with water.
Now that the skull is clean and white, you can display it proudly! If you want to further preserve it, consider coating it with polyurethane or another clear sealant.
This will help protect against moisture and insects while still allowing you to see the beautiful bones beneath.
Best Way to Clean a Deer Skull for European Mount
When it comes to cleaning a deer skull for a European mount, there are a few different ways that you can go about it. However, one method in particular seems to be the most effective and efficient way to get the job done right. This method involves using dermestid beetles to clean the skull of all flesh and tissue.
If you decide to use dermestid beetles to clean your deer skull, there are a few things that you need to do first. First, you need to remove as much meat and tissue from the skull as possible. This can be done by using a sharp knife or power washer.
Once most of the flesh has been removed, you will then need to boil the skull for around 30 minutes. This will help kill any bacteria that may be present on the skull.
After boiling the skull, it is time to introduce the dermestid beetles into the equation.
You will need to place the beetle larvae onto the surface of the skull and allow them to do their job. The larvae will eat away at any remaining flesh and tissue, leaving behind a completely clean skeleton. Once they have finished their meal, simply collect them up and dispose of them properly (outside!).
And there you have it – a quick and easy way to clean a deer skull for your European mount!
Credit: zekebloggingadventures.com
How Do You Remove Brain Tissue from a Deer Skull?
Removing brain tissue from a deer skull is not as difficult as it may seem. The first thing you need to do is remove the hide from the skull. This can be done by using a sharp knife to cut around the edge of the hide and then peeling it back.
Once the hide is removed, you will need to remove the eyes and nose. These can be pulled out with a pair of pliers. Next, you will need to remove the jawbone.
This can be done by cutting through the flesh that attaches it to the rest of the skull. Finally, you will need to scrape out all of the brain tissue from inside the skull using a spoon or your fingers.
How Do You Clean a Deer Skull Without Boiling It?
When cleaning a deer skull, there are a few different methods that can be used. One method is to boil the skull in water for a period of time. This will loosen the flesh and make it easier to remove.
Another method is to use a pressure washer or power washer to remove the flesh. This is a quicker method, but it can be more difficult to control the pressure and avoid damaging the skull.
How Long Should I Soak My Deer Skull in Peroxide?
Deer skulls can be soaked in peroxide to help clean and whiten them. The length of time that you soak the skull will determine how effective the peroxide is at cleaning and whitening the skull. Soaking for a longer period of time will result in a cleaner and whiter skull.
What Does Boiling a Deer Skull Do?
When boiling a deer skull, the main goal is to remove all the meat and tissue from the skull so you are left with a clean, white bone. This process can take anywhere from 24 hours to a week, depending on how big the deer skull is and how much meat and tissue is still attached to it.
The first step is to fill a large pot or barrel with water and bring it to a boil.
Then, add the deer skull to the pot and let it cook for at least 24 hours. You may need to add more water during this time as the water will evaporate.
After 24 hours, remove the deer skull from the pot and let it cool down so you can handle it.
Use a knife or power washer to remove any remaining meat or tissue. Once you have removed all the meat and tissue, boil the skull again for another 24 hours.
Once you have boiled the skull two times, it should be clean and white.
If there is any discoloration, you can try bleaching it with hydrogen peroxide or using oxalic acid.
How to REMOVE BRAIN from white-tailed deer – (Getting deer ready for shoulder mount)
Conclusion
The best way to get brains out of a deer skull is to use a saw. First, remove the eyes and nose with a sharp knife. Then, cut along the back of the head just above the neckline.
Use a hacksaw or reciprocating saw to cut through the skull plate. Be sure to wear gloves and eye protection when doing this. Finally, pry open the skull and remove the brain tissue.